You open your VPN app. It says Connected. Green light. You feel protected.
But there is one specific leak that catches even careful VPN users off guard — and most people never bother to check for it. Your real IP address might be hidden, but your DNS requests could still be going straight to your ISP. Every site you visit. Every domain your device looks up. Logged.
That is a DNS leak. And the unsettling part is that your VPN app will not warn you about it. It will just keep showing that green light.
Here is what a DNS leak actually is, why it happens, how to test for one in 60 seconds, and how to fix it — no terminal required.
What Is a DNS Leak? (The Locked Door, Open Window Problem)
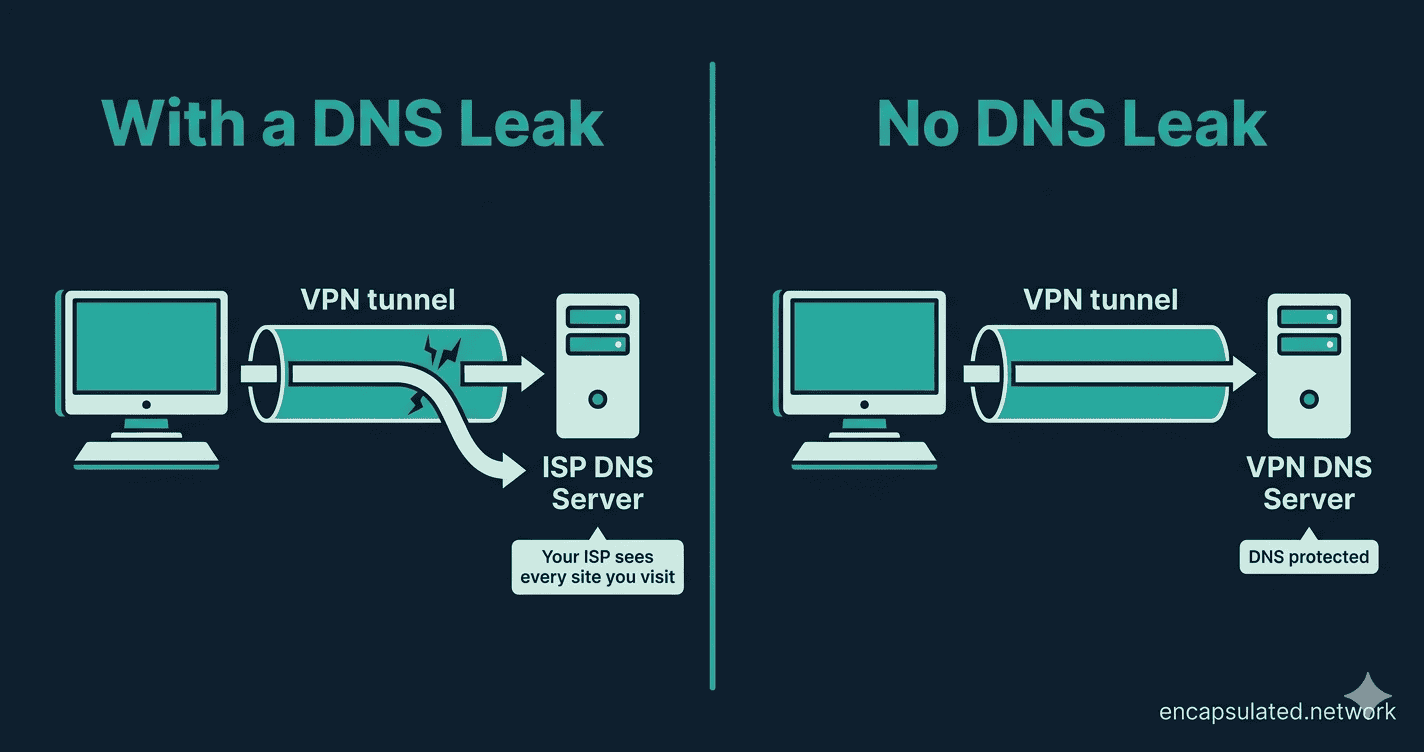
A DNS leak is a security flaw where your DNS requests bypass your VPN tunnel and go directly to your ISP — even while your VPN is actively connected.
To understand why that matters, you first need to know what DNS does.
DNS stands for Domain Name System, and it works like the internet’s phone book. Every time you type a website address — say, bbc.co.uk — your device does not actually know where that site lives. It sends a DNS query to a server asking: “What is the IP address for bbc.co.uk?” That server looks up the answer and sends it back. Your browser then connects to the right place.
Without a VPN, your ISP handles every one of those lookups. Which means your ISP has a running log of every domain you have ever visited — not the exact pages, but the domains. Every news site. Every health query. Every forum. All of it.
A working VPN is supposed to change that. Your DNS queries travel inside the encrypted tunnel to your VPN provider’s private DNS servers. Your ISP only sees scrambled traffic going to a VPN server. The domains you visit stay private. A proxy does not offer this — DNS queries bypass a proxy entirely and continue going through your ISP’s servers, which is one of the key differences between the two tools. If you’re weighing VPN vs. proxy, that distinction matters more than most comparisons acknowledge. If you want a fuller picture of how a VPN tunnel works, that is covered in detail in the VPN fundamentals guide.
A DNS leak breaks that protection in a specific way. Think of it like this: your VPN locks the front door of your house, but a DNS leak means your computer is still shouting your browsing requests out of an open window directly to your ISP. The lock is on, the connection looks secure, but your ISP is listening at the window the whole time.
The result: your ISP can see every domain you visit. Depending on where you live, they may be legally required to log and retain that information. And your VPN app will not tell you any of this is happening.
Why Is Your VPN Leaking? The Three Common Causes
You do not need to understand networking to understand why DNS leaks happen. Most of them come down to three causes.
Windows “Smart” Features Working Against You
Windows 8 and later — including Windows 10 and 11 — include a feature called Smart Multi-Homed Name Resolution (SMHNR). Microsoft designed it to speed up browsing: when you visit a site, Windows sends DNS queries to every available server at once and accepts whichever one responds first. Because your ISP’s DNS server is typically closer and faster than your VPN’s DNS server (which has to process requests through the encrypted tunnel), your ISP’s server tends to win the race — and Windows routes the query there instead.
This happens silently in the background. Your VPN app reports a connected status. Windows is still quietly routing DNS queries to your ISP. You would have no way of knowing without running a test.
The IPv6 Problem
The internet is slowly migrating from IPv4 (the older addressing system) to IPv6 (the newer one). Many VPNs were built primarily around IPv4 and do not handle IPv6 traffic fully. If your ISP has enabled IPv6 on your connection, your device may send IPv6 DNS queries that slip around the VPN tunnel entirely — going to your ISP’s servers rather than your VPN’s.
Your VPN protects your IPv4 traffic. Your IPv6 DNS requests leak straight out. The VPN app does not know, so it keeps showing a connected status.
Transparent ISP Proxies
Some ISPs use transparent DNS proxies — systems that intercept outgoing DNS requests and redirect them to the ISP’s own servers, regardless of what DNS settings you have configured on your device. Even if you have manually set a private DNS server like Cloudflare’s 1.1.1.1, a transparent proxy can silently reroute those queries without your knowledge. This is more common in certain regions and with certain ISP networks, but it is worth knowing about.
How to Run a DNS Leak Test in 60 Seconds
Here is something important: you cannot tell whether you have a DNS leak by looking at your VPN app. The app will show “Connected” either way. The only way to know is to test.
The test takes about 60 seconds and requires nothing beyond a browser.
Step 1 — Check Your Baseline (VPN Off)
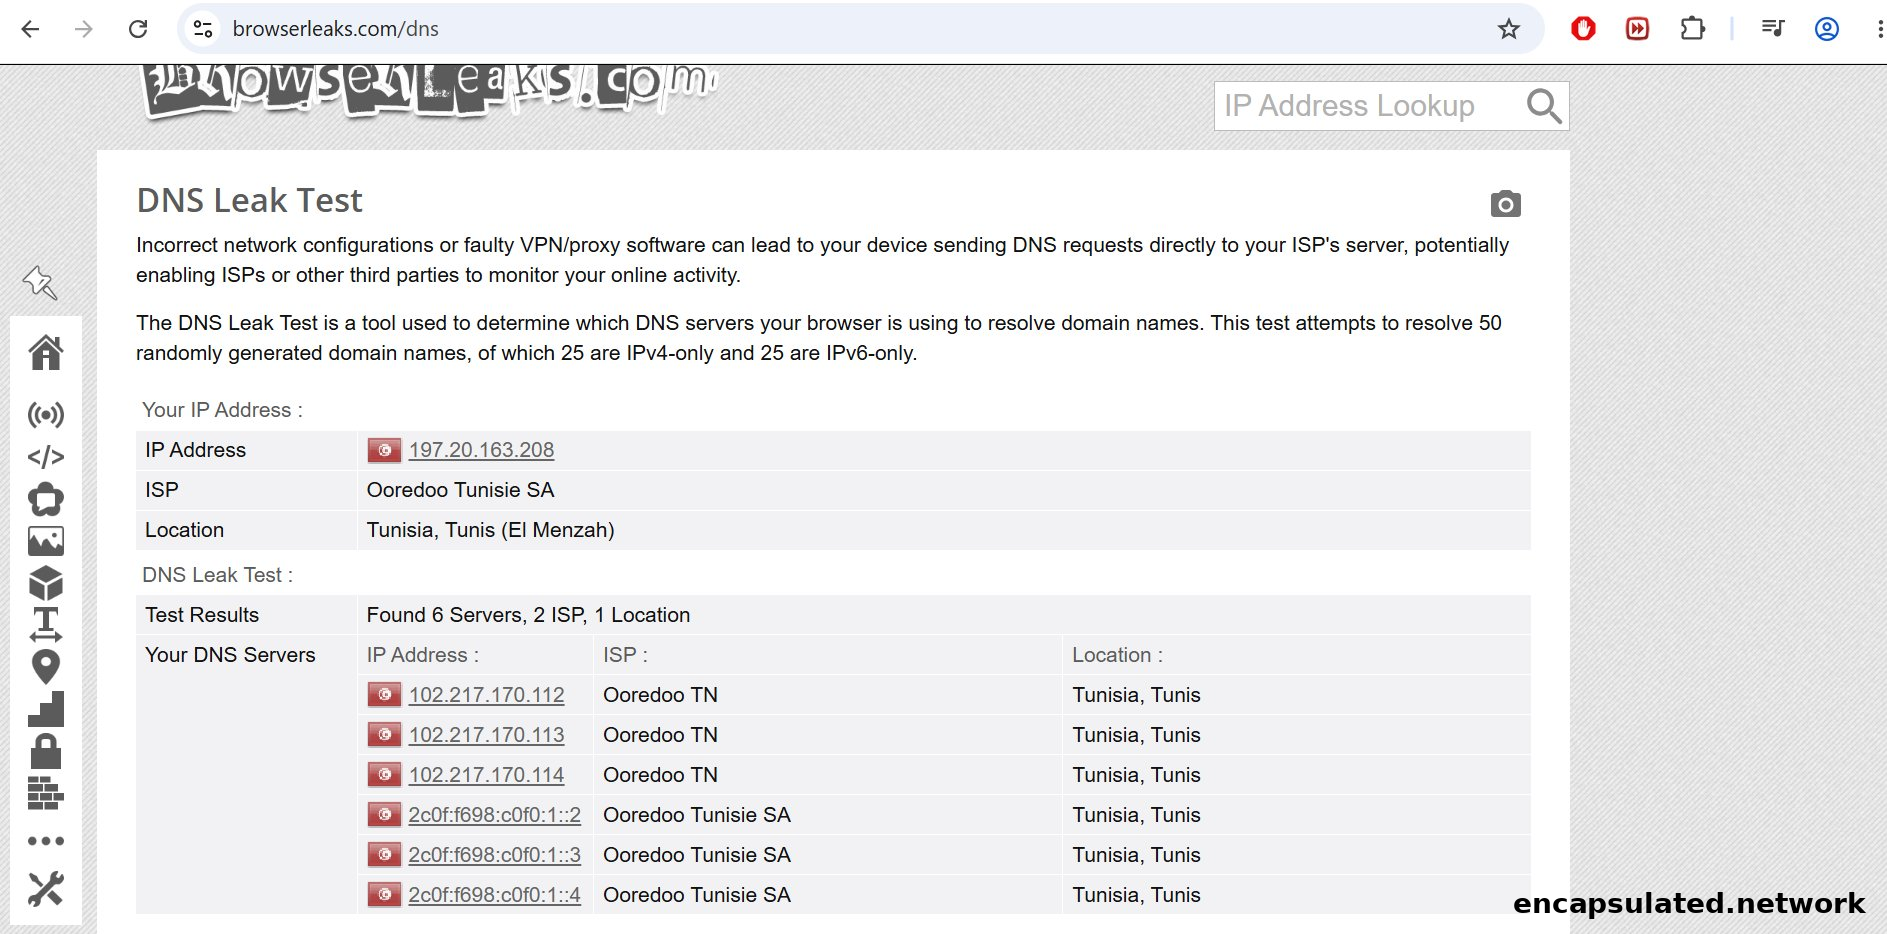
Before connecting your VPN, go to dnsleaktest.com or ipleak.net. Note the IP address shown and, importantly, the names of the DNS servers listed. You will see your real ISP’s name and likely your actual city or region. This is your baseline — what the internet sees without any VPN protection.
Step 2 — Connect Your VPN
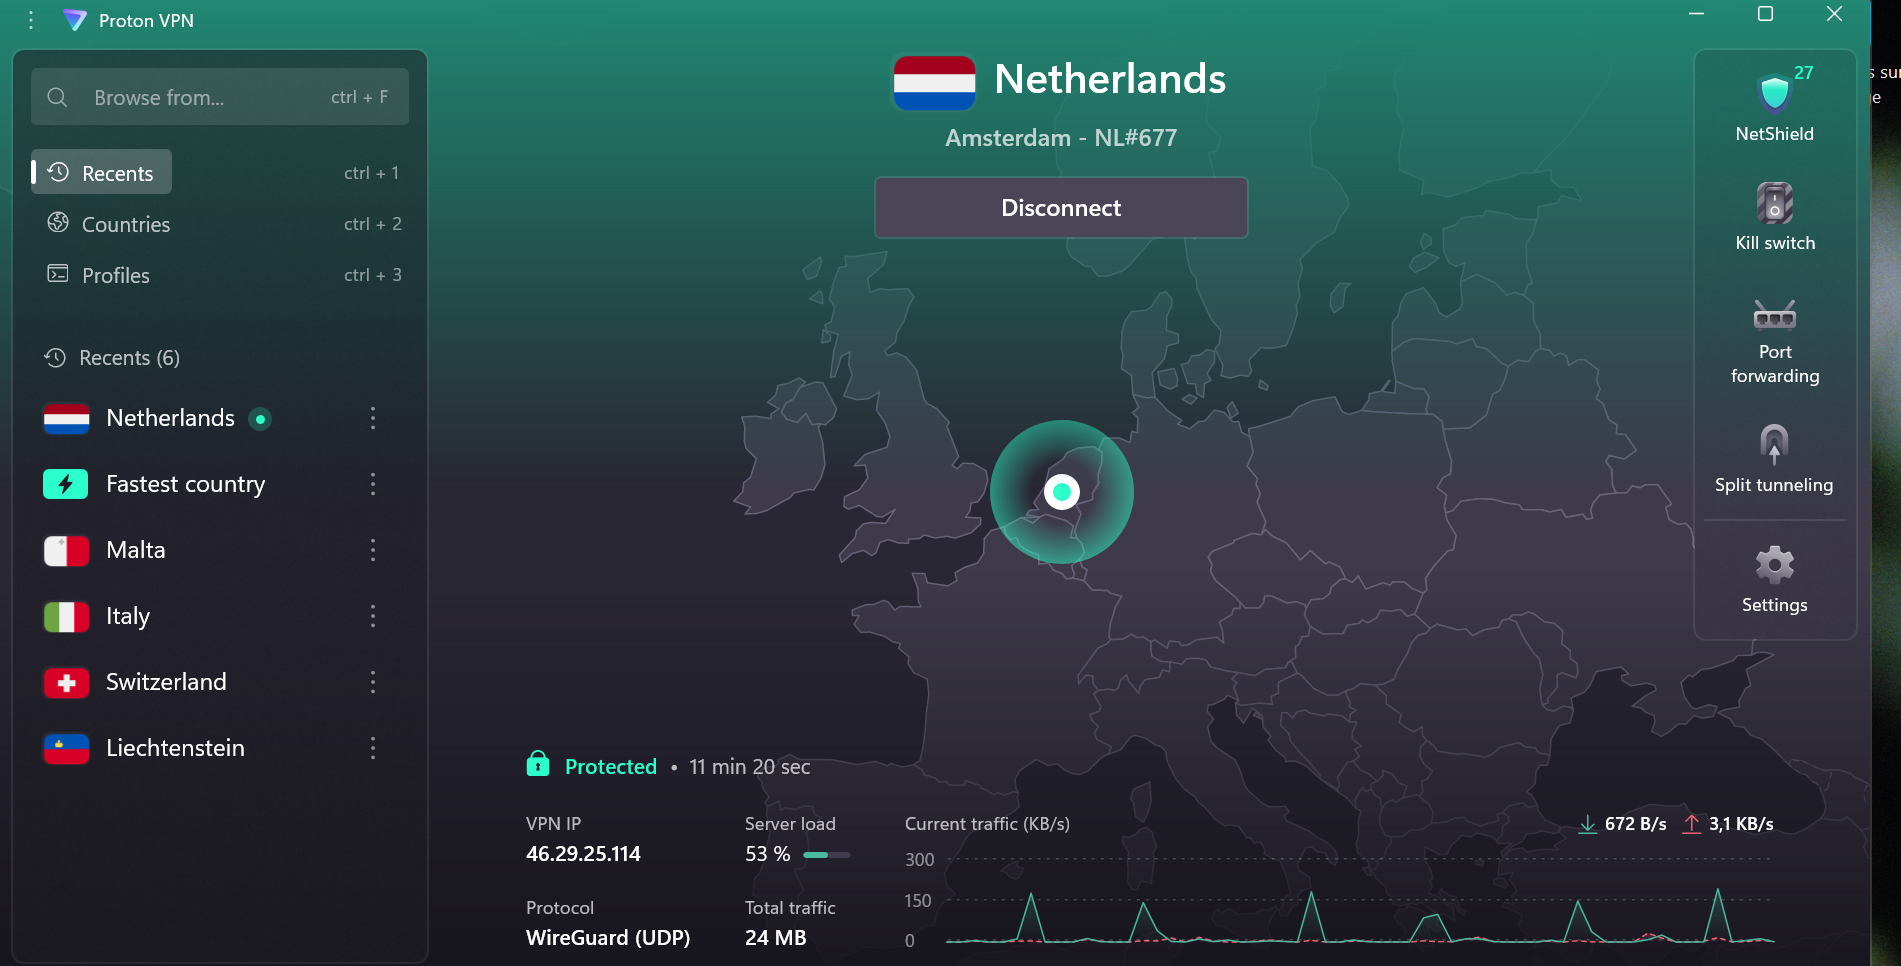
Open your VPN app and connect to a server in a different country. Switzerland and the Netherlands are useful reference points because they are far enough from most users’ real locations to make a leak immediately obvious.
Step 3 — Run the Test Again (VPN On)
Go back to the testing site and reload the page fresh — do not use cached results from Step 1. Click Standard Test. Wait for the results.
How to Read Your Results
Passed — no leak: The results show only DNS servers associated with your VPN provider, located in the country you connected to. Your ISP’s name does not appear anywhere. Your connection is secure.
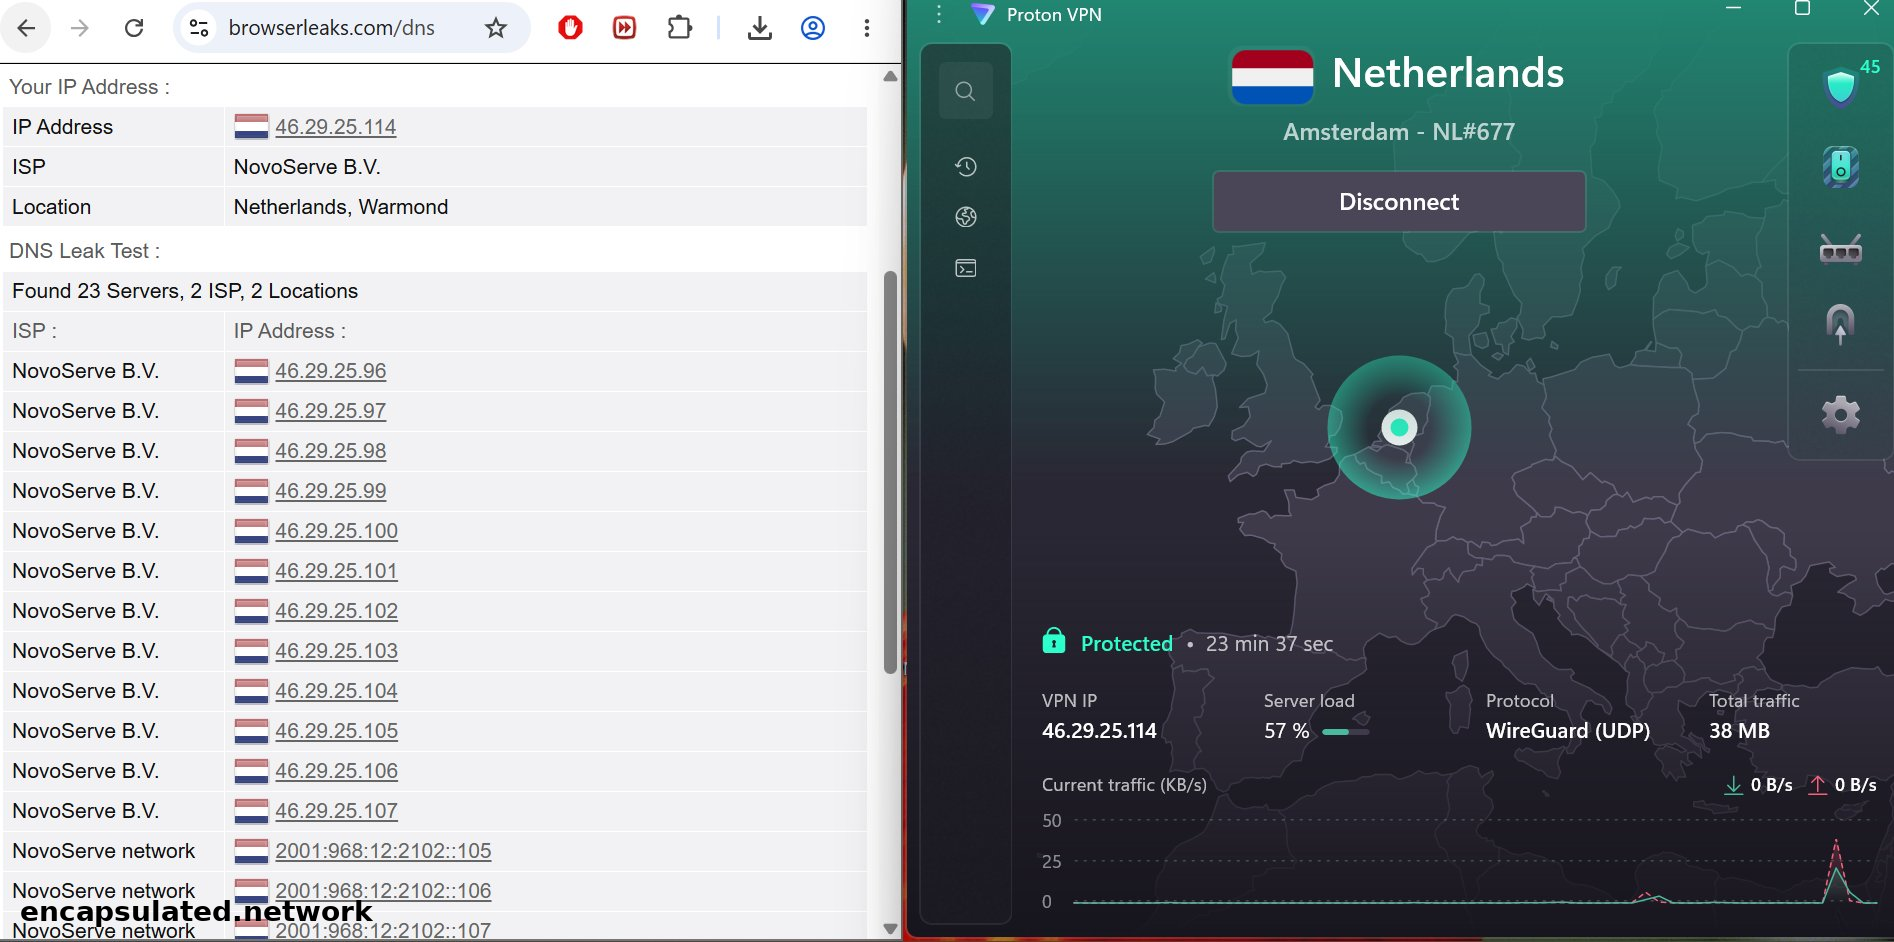
Failed — DNS leak confirmed: You see one or more servers that mention your real ISP, or that show your actual location rather than the VPN server’s country. Even a single entry like this is a confirmed DNS leak. Your ISP can see your DNS queries despite the VPN being connected.
A note on the Extended Test option on dnsleaktest.com: it queries more servers and takes longer, but gives additional certainty. The Standard Test is sufficient for most people.
How to Fix a DNS Leak (No Terminal Required)
If the test shows a leak, there are four fixes — work through them in order, from simplest to most involved. All of them are done through normal settings menus. No command line needed.
Fix 1 — Check Your VPN App’s Built-in Settings First
Most reputable VPN apps have a DNS leak protection toggle that is sometimes disabled by default. Open your VPN’s Settings or Preferences and look for:
- DNS Leak Protection or Prevent DNS Leaks — enable this if it is present
- Kill Switch — enable this too. A kill switch cuts all internet traffic the moment your VPN connection drops, even for a fraction of a second. This prevents your real IP from being exposed during reconnects. If you are not familiar with how a kill switch works, this guide explains VPN kill switch in full.
Once both are enabled, re-run the leak test. This resolves the majority of DNS leak cases without any further action needed.
Fix 2 — Set a Trusted DNS Server Manually
If your VPN app has no built-in DNS protection, you can manually configure your device to use a privacy-respecting DNS provider instead of your ISP’s servers. Good options:
- Cloudflare: 1.1.1.1
- Quad9: 9.9.9.9
- Your VPN provider’s own DNS server address (check their support documentation)
On Windows: Go to Settings → Network & Internet → Change adapter options. Right-click your active connection and select Properties. Click Internet Protocol Version 4 (TCP/IPv4), then Properties. Select “Use the following DNS server addresses” and enter 1.1.1.1 as the preferred DNS server. Click OK.
On macOS: Go to System Settings → Network. Click your active connection, then select Details. Go to the DNS tab and click the + button to add 1.1.1.1 to the list. Click OK.
Re-run the test after saving these changes.
If you are running a router VPN setup, the DNS fix applies at the router level rather than per device: set the DNS server in your router’s DHCP settings to your provider’s resolver or a private resolver like 1.1.1.1. Every device on the network inherits the correct DNS automatically — no per-device configuration needed.
Fix 3 — Disable IPv6 on Your Device
If your VPN does not support IPv6 and your ISP has enabled it, your IPv6 DNS requests are bypassing the tunnel entirely. The cleanest fix is to disable IPv6 at the OS level.
On Windows: In the same adapter Properties window used in Fix 2, uncheck the box that says Internet Protocol Version 6 (TCP/IPv6). Click OK.
Disabling IPv6 has no meaningful impact on day-to-day browsing for the vast majority of users — almost all websites still work perfectly over IPv4. If you notice any issues after doing this, you can re-enable it the same way.
Fix 4 — Enable Secure DNS in Your Browser
This is not a standalone fix — it is an extra layer that works alongside the fixes above. Modern browsers support DNS-over-HTTPS (DoH), which encrypts DNS queries at the browser level. This is particularly useful on networks where transparent ISP proxies may be intercepting DNS traffic.
On Chrome or Edge: Settings → Privacy and security → Security → scroll to “Use secure DNS” → enable it and select a provider (Cloudflare or your VPN provider’s DNS if listed).
On Firefox: Settings → Privacy & Security → scroll to DNS over HTTPS. Firefox uses a protection-level model — you will see options for Default Protection, Increased Protection, Max Protection, and Off. Select Increased or Max Protection and choose a provider. The path is correct; the UI looks slightly different from a simple on/off toggle.
Once you have applied whichever fix applies to your situation, run the leak test one more time to confirm the issue is resolved.
DNS Leaks on Android and iOS
Mobile users face the same underlying risk, though the causes and fixes differ slightly between platforms.
Android
VPN apps generally handle DNS well on Android, but the most reliable configuration is to enable Always-on VPN alongside the “Block connections without VPN” option. This ensures DNS queries never leave the device outside the VPN tunnel — not even briefly during a reconnect. You can find this setting under Settings → Network & Internet → VPN → tap the gear icon next to your VPN. The full Android setup process — including Always-on VPN, Block connections without VPN, Private DNS configuration, and the battery optimization step — is covered end-to-end in our Android VPN setup guide. The kill switch guide covers the theory of why these settings matter if you need that context first.
iOS
iOS VPN behaviour is more complicated than the other platforms covered here, and worth understanding honestly.
Apple introduced a NetworkExtension API flag called includeAllNetworks in iOS 14, which — when enabled — forces all traffic including DNS through the VPN tunnel. However, it is off by default, and many VPN apps do not enable it because it can break local network functionality like AirDrop and local printer access.
Beyond that, iOS has a longer-standing and well-documented issue: when you activate a VPN, iOS does not close existing network connections. Any connections that were established before the VPN connected can persist outside the tunnel and continue leaking traffic — including DNS queries — until they time out naturally. ProtonVPN documented this behaviour in 2020, and security researcher Michael Horowitz confirmed it was still present through iOS 15.6 in research covered by major technology publications.
The practical upshot: iOS VPN protection is less reliable than Android in this area. The best available mitigations are to use a VPN app from a provider that enables includeAllNetworks (check your provider’s iOS documentation), to toggle Aeroplane Mode on and off after connecting your VPN (this closes existing connections and forces all new ones through the tunnel), and to be aware that split tunneling configurations on iOS can compound the issue further. Running a DNS leak test on iOS after connecting is the only way to know what your specific app and iOS version are actually doing.
For Linux users, the DNS leak fix is different — it involves integrating with systemd-resolved and, in some cases, adding PostUp hooks to your WireGuard configuration. The full Linux-specific fix, along with steps to verify your VPN is working on Linux end-to-end, is covered in our Linux VPN setup guide.
DNS Leaks vs. WebRTC Leaks — The Quick Distinction
These two vulnerabilities are often mentioned in the same breath and frequently confused with each other. They are different problems.
A DNS leak exposes the domains you visit via DNS queries that bypass the VPN tunnel — your ISP sees what you are looking up. A WebRTC leak exposes your real IP address through browser WebRTC APIs, regardless of whether your VPN is connected — sites and scripts can see your IP directly. Different cause, different exposure, different fix. Both are invisible without testing. If you have run a DNS leak test, it is worth running a WebRTC leak test separately — most of the same tools (ipleak.net in particular) will show both in one pass.
Quick Checklist — Staying Leak-Free
- Run a DNS leak test immediately after changing any DNS settings or enabling leak protection — confirm it actually worked
- Re-test once a week and always after a major OS update, which can reset network settings
- Keep your VPN app updated — many leaks are caused by outdated client software that has not received a patch
- Enable the Kill Switch in your VPN app — this and DNS leak protection work together, not interchangeably
- Enable DNS-over-HTTPS in your browser as a secondary layer, especially on public or shared networks
- If your VPN does not support IPv6, disable IPv6 on your device
- Be cautious with free VPNs — a significant proportion of free VPN apps have been documented leaking DNS requests, compared to audited paid providers
Bottom Line
A DNS leak is one of the more frustrating privacy gaps a VPN can have — because it is invisible. Your app shows a green light, your IP looks hidden, and your ISP is quietly logging every domain you visit anyway. The good news is that it is also one of the easier problems to confirm and fix. A 60-second test on dnsleaktest.com tells you exactly where you stand, and in most cases enabling your VPN’s built-in DNS leak protection resolves it immediately. If your VPN does not have that option, it is a reasonable signal to consider switching to one that does. DNS protection is not an advanced feature — it is a basic part of what a VPN is supposed to do.
Frequently Asked Questions
Does a DNS leak expose my IP address?
Not directly. A DNS leak exposes the domains you visit to your ISP’s DNS servers — not your IP address itself. Your IP may still appear hidden. However, a log of every domain you have visited is often just as revealing as your IP address, and in many countries ISPs are legally required to retain this data and hand it over on request. Hiding your IP while leaking your DNS queries gives you a false sense of security.
Which DNS leak test tool is most reliable?
Both dnsleaktest.com and ipleak.net are widely used and trustworthy. For most people, the Standard Test on dnsleaktest.com is sufficient. Run it immediately after connecting your VPN, before opening anything else in the browser, to avoid cached DNS entries from before the VPN connected skewing the results.
Can a VPN kill switch prevent DNS leaks?
No — and this is a common misconception worth clearing up. A kill switch prevents your real IP from being exposed if the VPN drops unexpectedly — it cuts all internet access until the VPN reconnects. It does not prevent DNS leaks that occur while the VPN is actively connected. They solve different problems. You need both: kill switch for connection-drop exposure, DNS leak protection for in-tunnel DNS routing.
My VPN says it has built-in DNS leak protection. Do I still need to test?
Yes. Marketing claims and actual implementation do not always match, and even VPNs with genuine leak protection can leak in specific conditions — particularly after reconnecting to a new network, switching servers, or following an OS update that resets DNS settings. The test takes 60 seconds and gives you certainty that the protection is actually working. Trust but verify.
Is a DNS leak a sign that my VPN is broken?
Not broken — but insufficient for your network environment. DNS leaks are common even with otherwise functional VPNs, particularly on Windows due to Smart Multi-Homed Name Resolution, on networks that use IPv6 without full VPN support, or on ISP networks with transparent DNS proxies. It is a specific configuration gap, not a sign that the VPN is failing at everything. The fixes in this guide address each cause directly.
How often should I run a DNS leak test?
Once a week is a reasonable habit, and always after any OS update, VPN app update, or change to your network setup. OS updates in particular have a history of resetting network and DNS settings silently. A 60-second test after each update is enough to catch any regression before it becomes a sustained leak.