Linux is the most privacy-conscious operating system you can run. And yet most VPN setup guides treat it as an afterthought — a footnote after Windows and macOS, if they cover it at all.
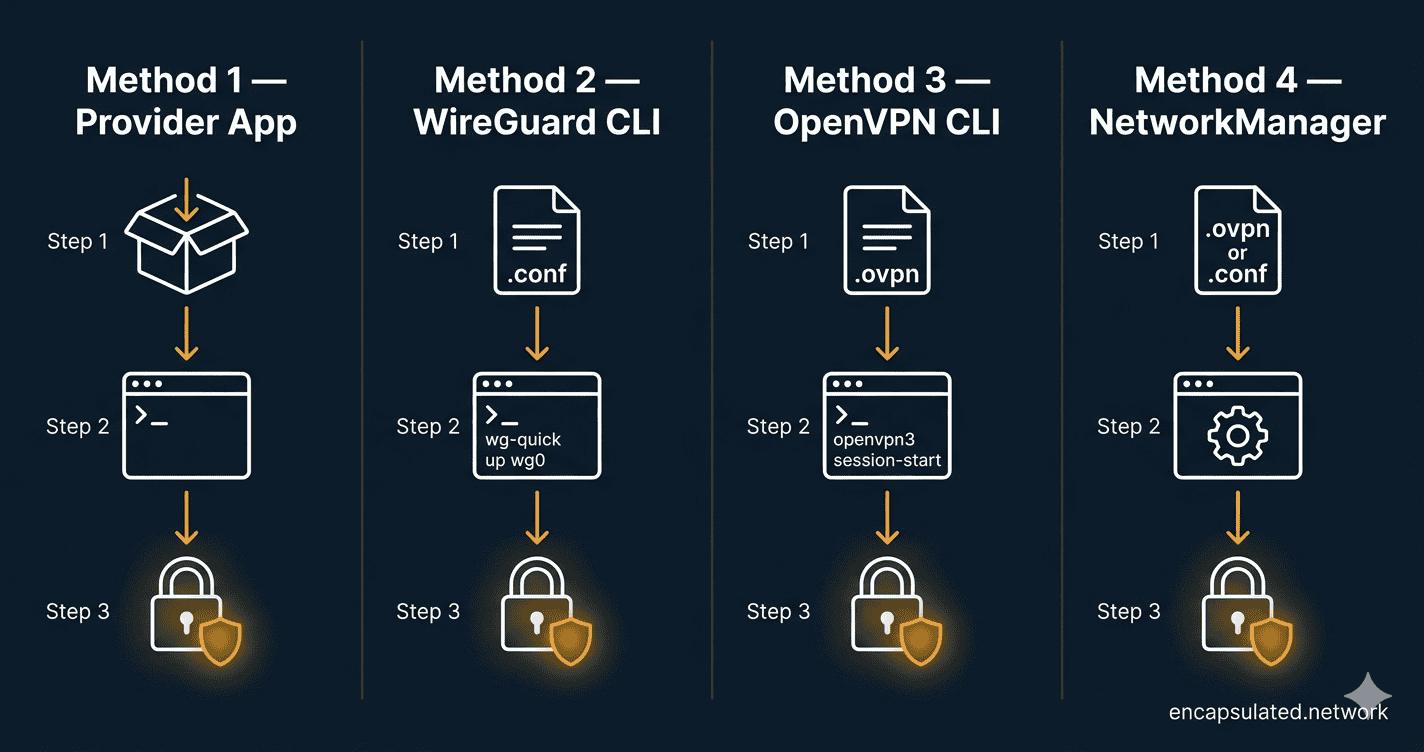
This guide fixes that. It covers four methods for setting up a VPN on Linux, from the fastest one-command install to a fully hardened manual configuration. Pick the method that matches your setup and skip the rest.
Not sure which protocol to use before you start? Our VPN protocols guide covers every option in plain English. And if you’re new to VPNs entirely, start with how a VPN actually works before diving into setup.
| Your situation | Method | Jump to |
|---|---|---|
| You use a major commercial VPN (ProtonVPN, NordVPN, Mullvad, IVPN) | Method 1 — Official App | Jump to Method 1 |
| You want the fastest, most modern manual setup | Method 2 — WireGuard CLI | Jump to Method 2 |
| Your provider requires OpenVPN, or you’re behind a restrictive firewall | Method 3 — OpenVPN CLI | Jump to Method 3 |
| You prefer a GUI or already use NetworkManager | Method 4 — NetworkManager | Jump to Method 4 |
Before You Start
You will need two things: a paid VPN subscription from a provider that supports Linux, and a machine running a current Debian/Ubuntu or Fedora/RHEL-family distribution. All commands in this guide are tested on Ubuntu 22.04/24.04, Debian 12, and Fedora 41/42. Where commands differ between distro families, both variants are shown.
For privacy-first providers with strong Linux support, Mullvad, ProtonVPN, and IVPN are all solid choices. This guide does not recommend providers through affiliate links — the method works with any provider that supplies WireGuard .conf files or OpenVPN .ovpn files.
Method 1: Official Provider Apps (The Fastest Route)
If you use one of the major commercial VPN providers, an official Linux app is almost certainly available — and it is the fastest, most reliable path to a working VPN. The app handles configuration, key rotation, kill switch, and DNS protection automatically. Start here.
ProtonVPN and NordVPN — Repository Install
Both ProtonVPN and NordVPN distribute native Linux clients via signed package repositories. This gives you automatic updates through your system package manager.
ProtonVPN (Ubuntu/Debian) — GUI app:
# Check Proton's official install page for the latest package version before running:
# https://protonvpn.com/support/linux-vpn-setup/

# Download the repository configuration package (version current as of April 2026)
wget https://repo.protonvpn.com/debian/dists/stable/main/binary-all/protonvpn-stable-release_1.0.8_all.deb

# Install the repo config
sudo dpkg -i ./protonvpn-stable-release_1.0.8_all.deb
sudo apt update

# Install the GUI app
sudo apt install proton-vpn-gnome-desktop
ProtonVPN (Ubuntu/Debian) — CLI only (no GUI required):
The GUI app (proton-vpn-gnome-desktop) and the terminal CLI are separate packages. If you are on a headless server or prefer the terminal, install the CLI package instead:
# After adding the repository (steps above), install the CLI package
sudo apt install proton-vpn-cli
ProtonVPN (Fedora/RHEL):
# Download the repository configuration package
wget https://repo.protonvpn.com/fedora-$(rpm -E %fedora)-stable/public_key.asc
sudo rpm --import public_key.asc
sudo dnf config-manager --add-repo https://repo.protonvpn.com/fedora-$(rpm -E %fedora)-stable/ProtonVPN_fedora_stable.repo

# Install GUI app or CLI — choose one
sudo dnf install proton-vpn-gnome-desktop   # GUI
sudo dnf install proton-vpn-cli              # CLI only
NordVPN (Ubuntu/Debian and Fedora):
# Universal installer script — works on both distro families
sh <(curl -sSf https://downloads.nordcdn.com/apps/linux/install.sh)
After installation, add your user to the nordvpn group and reboot (or log out and back in) before using the CLI:
sudo usermod -aG nordvpn $USERMullvad and IVPN — Signed Package Install
Mullvad (Ubuntu/Debian):
# Add Mullvad repository signing key
sudo curl -fsSLo /usr/share/keyrings/mullvad-keyring.asc https://repository.mullvad.net/deb/mullvad-keyring.asc

# Add repository
echo "deb [signed-by=/usr/share/keyrings/mullvad-keyring.asc arch=$( dpkg --print-architecture )] https://repository.mullvad.net/deb/stable $(lsb_release -cs) main" | sudo tee /etc/apt/sources.list.d/mullvad.list

# Install
sudo apt update && sudo apt install mullvad-vpn
Mullvad (Fedora/RHEL):
# Add repository and install
sudo dnf config-manager --add-repo https://repository.mullvad.net/rpm/stable/mullvad.repo
sudo dnf install mullvad-vpn
IVPN (Ubuntu/Debian):
curl -fsSL https://repo.ivpn.net/stable/ubuntu/generic.gpg | gpg --dearmor | sudo tee /usr/share/keyrings/ivpn-archive-keyring.gpg >/dev/null
curl -fsSL https://repo.ivpn.net/stable/ubuntu/generic.list | sudo tee /etc/apt/sources.list.d/ivpn.list
sudo apt update && sudo apt install ivpn-ui
Connecting and Managing the Daemon
After installing, most providers offer both a GUI and a CLI. The CLI daemon runs as a background service and starts automatically on boot.
Mullvad CLI — connect in three commands:
# Log in with your Mullvad account number (no email required)
mullvad account login YOUR_ACCOUNT_NUMBER

# Set a server (or let Mullvad pick the closest one)
mullvad relay set location se sto    # Sweden, Stockholm — change as needed

# Connect
mullvad connect
NordVPN CLI:
nordvpn login
nordvpn connect
ProtonVPN CLI (requires proton-vpn-cli package — see install note above):
# Sign in — you will be prompted for your password
protonvpn signin YOUR_USERNAME

# Connect (connects to the fastest server by default)
protonvpn connect
To verify your connection is active and check your current server:
# Mullvad
mullvad status

# NordVPN
nordvpn status

# ProtonVPN
protonvpn status
When to Move to a Manual Method
The official app is the right choice for most users. Move to a manual method (Methods 2–4) only if: your provider does not offer a Linux app, you need a specific configuration the app does not expose, you are managing a headless server with no GUI, or you are setting up a VPN on a system where installing a full app is not practical.
Method 2: WireGuard Manual Setup (CLI)
WireGuard is built directly into the Linux kernel — which means on modern distributions, the module is already there. You just need the userspace tools and a configuration file. For the full case for WireGuard over OpenVPN and when each protocol wins, see our WireGuard vs. OpenVPN comparison.
Step 1 — Install WireGuard Tools and Verify Kernel Support
Ubuntu/Debian:
sudo apt update && sudo apt install wireguardFedora/RHEL:
sudo dnf install wireguard-toolsConfirm the kernel module is available:
modinfo wireguardIf this returns module details, you are ready. If it returns an error, your kernel is older than 5.6 — run uname -r to check your kernel version and consider upgrading.
Step 2 — Generate Your Cryptographic Keys
Skip this step if your provider supplies a ready-made .conf file (most do — check your provider’s Linux download page). If you are configuring a peer-to-peer setup or your provider requires you to supply your own public key, generate the pair as follows:
# Generate private key and derive public key from it
wg genkey | tee /etc/wireguard/privatekey | wg pubkey > /etc/wireguard/publickey

# Lock down permissions — the private key must never be readable by other users
chmod 600 /etc/wireguard/privatekey

# View the keys
cat /etc/wireguard/privatekey
cat /etc/wireguard/publickey
Your public key is what you register with your provider’s dashboard or peer server. Your private key never leaves your machine.
Step 3 — Create the Configuration File
Create /etc/wireguard/wg0.conf. The annotated template below applies whether you generated your own keys or are adapting a provider-supplied file:
[Interface]
# Your private key — generated in Step 2, or copied from provider dashboard
PrivateKey = YOUR_PRIVATE_KEY_HERE

# Internal IP address assigned to this WireGuard interface
Address = 10.64.X.X/32

# DNS server to use while the tunnel is active — prevents DNS leaks
# Replace with your provider's DNS IP, or use a trusted resolver
DNS = 10.64.0.1

[Peer]
# The VPN server's public key — provided by your provider
PublicKey = SERVER_PUBLIC_KEY_HERE

# (Optional) Pre-shared key for an additional layer of symmetric encryption
# PresharedKey = PRESHARED_KEY_HERE

# The server's public endpoint — IP:port or hostname:port
Endpoint = SERVER_IP_OR_HOSTNAME:51820

# Route all traffic through the tunnel
# Use 0.0.0.0/0, ::/0 for full tunnel (all traffic)
# Or list specific subnets for split-tunnel mode
AllowedIPs = 0.0.0.0/0, ::/0

# Keeps the NAT mapping alive — set this if your connection drops when idle
PersistentKeepalive = 25
Lock down the config file’s permissions:
chmod 600 /etc/wireguard/wg0.confUsing a provider-supplied .conf file? Copy it directly to /etc/wireguard/wg0.conf (renaming it from whatever the provider named it), set permissions with chmod 600, and skip to Step 4.
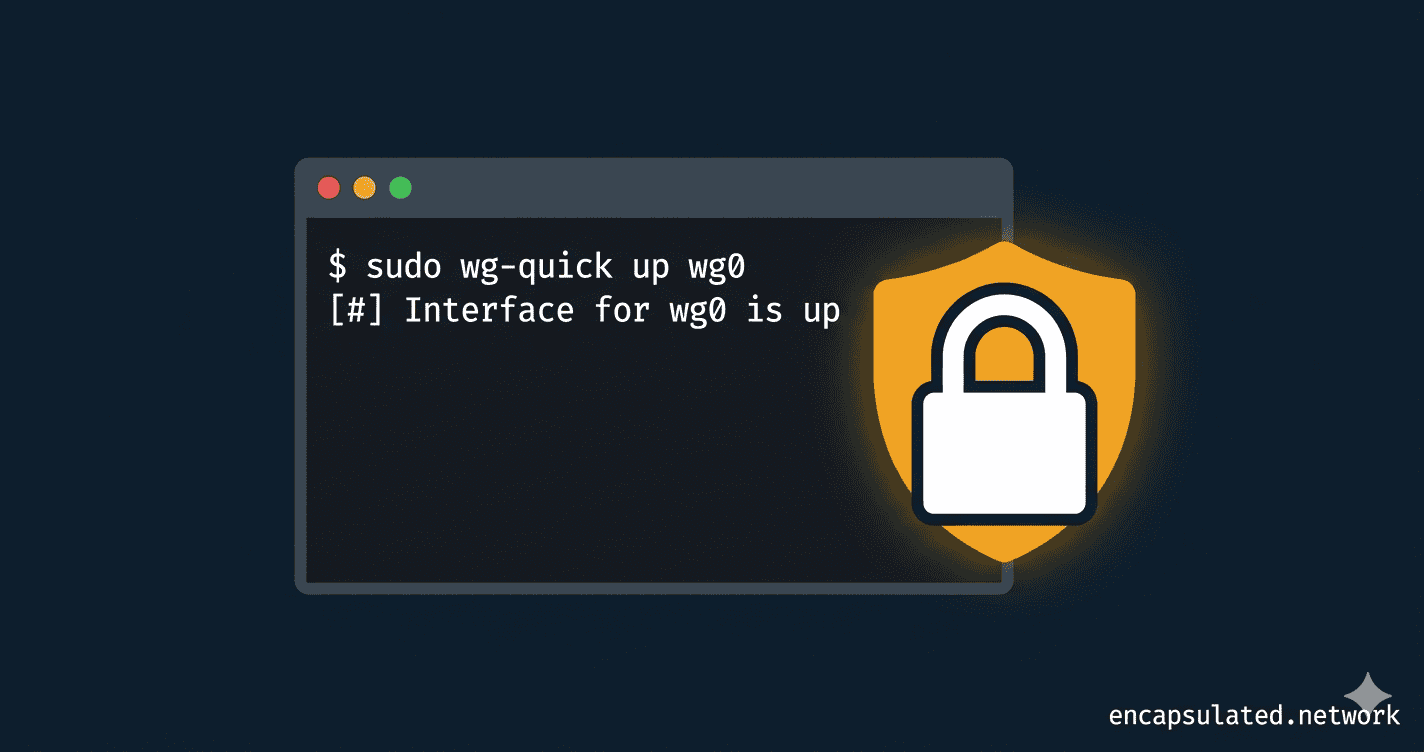
Step 4 — Bring the Tunnel Up
# Start the tunnel manually
sudo wg-quick up wg0

# Check tunnel status — shows handshake, bytes transferred, peer info
sudo wg show
To bring the tunnel down:
sudo wg-quick down wg0Step 5 — Enable Auto-Start on Boot
# Enable the tunnel as a systemd service
sudo systemctl enable wg-quick@wg0

# Start it now without rebooting
sudo systemctl start wg-quick@wg0

# Check service status
sudo systemctl status wg-quick@wg0
The @wg0 suffix refers to your config file name. If you named your config wg1.conf, use wg-quick@wg1 instead.
Method 3: OpenVPN CLI
Use OpenVPN when your provider requires it, or when you need to connect through a restrictive network that blocks WireGuard’s UDP traffic — OpenVPN can run over TCP on port 443, which is indistinguishable from standard HTTPS traffic to most firewalls.
This section covers the modern OpenVPN 3 client first, then the legacy OpenVPN 2.x approach as a fallback.
Option A — OpenVPN 3 Client (Recommended)
OpenVPN 3 is session-based rather than process-based, runs without root privileges for most operations, and is the current standard for desktop Linux deployments.
Ubuntu/Debian:
# Add OpenVPN repository
sudo mkdir -p /etc/apt/keyrings
curl -fsSL https://packages.openvpn.net/packages-repo.gpg | sudo tee /etc/apt/keyrings/openvpn.asc >/dev/null
echo "deb [signed-by=/etc/apt/keyrings/openvpn.asc] https://packages.openvpn.net/openvpn3/debian $(lsb_release -cs) main" | sudo tee /etc/apt/sources.list.d/openvpn3.list
sudo apt update && sudo apt install openvpn3
Fedora/RHEL:
# Enable the OpenVPN 3 Copr repository first — required on Fedora
# Verify this is still the current method at: https://community.openvpn.net/openvpn/wiki/OpenVPN3Linux
sudo dnf copr enable dsommers/openvpn3

# Install the client
sudo dnf install openvpn3-client
Download your provider’s .ovpn configuration file, then import and connect:
# Import the configuration — give it a memorable name with --name
openvpn3 config-import --config /path/to/your-provider.ovpn --name myvpn --persistent

# Start a session using the config name
openvpn3 session-start --config myvpn

# Check active sessions
openvpn3 sessions-list

# Disconnect
openvpn3 session-manage --config myvpn --disconnect
To start the VPN automatically on boot, enable the built-in systemd service unit. Replace myvpn with the name you gave the config during import. The exact unit name can vary between OpenVPN 3 versions — verify yours first:
# Confirm the correct unit name on your system
systemctl list-unit-files | grep openvpn3

# Enable and start the session service (adjust unit name if your output differs)
sudo systemctl enable --now [email protected]

# Check status
sudo systemctl status [email protected]
Option B — OpenVPN 2.x (Legacy Fallback)
Use the legacy client if your provider’s configuration requires features not yet in OpenVPN 3, or if you are on an older distribution.
Ubuntu/Debian:
sudo apt update && sudo apt install openvpnFedora/RHEL:
sudo dnf install openvpnConnect directly with your .ovpn file:
sudo openvpn --config /path/to/your-provider.ovpnTo run as a persistent background service with auto-start:
# Copy the .ovpn file to the OpenVPN config directory
sudo cp /path/to/your-provider.ovpn /etc/openvpn/client/myvpn.conf

# Enable and start the service
sudo systemctl enable openvpn-client@myvpn
sudo systemctl start openvpn-client@myvpn

# Check status
sudo systemctl status openvpn-client@myvpn
If your provider supplies separate certificate files alongside the .ovpn, copy them to the same directory (/etc/openvpn/client/) and update the file paths inside the config accordingly.
A Note on DCO Performance
If your provider’s server is running OpenVPN 2.6+, Data Channel Offload (DCO) may already be active — moving OpenVPN’s packet handling into kernel space for significantly faster speeds. DCO availability depends on which module path your server uses: the in-tree ovpn module (merged into Linux kernel 6.16 in April 2025, used with OpenVPN 2.7+), or the out-of-tree ovpn-dco module (used with OpenVPN 2.6.x on older kernels). Neither is guaranteed to be active without verification. See our OpenVPN DCO guide for the full technical breakdown and exact steps to confirm whether DCO is running on your connection.
Method 4: NetworkManager (GUI and nmcli)
NetworkManager is the connection manager on most desktop Linux distributions. It supports VPN connections via import plugins, and works with both WireGuard and OpenVPN.
Install the Required Plugins
WireGuard support has been built directly into NetworkManager since version 1.16 (released March 2019). On Ubuntu 22.04+, Debian 12+, and Fedora 41+, no separate WireGuard plugin is needed — nmcli connection import type wireguard works out of the box. OpenVPN does require a plugin.
Ubuntu/Debian:
# OpenVPN plugin (WireGuard is already supported natively)
sudo apt install network-manager-openvpn network-manager-openvpn-gnome
Fedora/RHEL:
# OpenVPN plugin (WireGuard is already supported natively)
sudo dnf install NetworkManager-openvpn NetworkManager-openvpn-gnome
Restart NetworkManager after installing plugins:
sudo systemctl restart NetworkManagerGUI Import — GNOME Settings
- Open Settings → Network
- Click the + button next to VPN
- Choose Import from file…
- Select your
.ovpnor.conffile - Enter credentials if prompted, then save
- Toggle the VPN on from the network menu in the top bar
KDE Plasma users: go to System Settings → Connections → Add and select the appropriate VPN type, then import your config file.
Power Method — nmcli Import
For headless systems or users who prefer the terminal, nmcli can import and activate VPN connections without a GUI:
# Import an OpenVPN config
sudo nmcli connection import type openvpn file /path/to/your-provider.ovpn

# Import a WireGuard config
sudo nmcli connection import type wireguard file /path/to/wg0.conf

# List all connections (confirm the VPN appears)
nmcli connection show

# Activate the VPN by name
nmcli connection up YOUR_VPN_CONNECTION_NAME

# Deactivate
nmcli connection down YOUR_VPN_CONNECTION_NAME
To inject credentials into an imported profile (so you are not prompted each time):
nmcli connection modify YOUR_VPN_CONNECTION_NAME +vpn.secrets "password=YOUR_PASSWORD"Solving Common Import Failures
WireGuard config file not recognised: NetworkManager’s WireGuard plugin requires the file to end in .conf. If your provider gave you a file ending in .wg or another extension, rename it before importing.
“Missing certificate password” prompt on every connect: Your .ovpn file references external certificate files that were not bundled into it. Place all referenced files (.crt, .key, .pem) in the same directory as the .ovpn file and reimport.
VPN connects but no traffic routes through it: Check that the imported profile has Use this connection only for resources on its network unchecked. In the GUI, this is under IPv4 Settings → Routes.
Important: NetworkManager does not configure a kill switch by default. If the VPN connection drops, your traffic will continue over your regular connection with your real IP exposed. See the kill switch section below.
Security Hardening: Making Your VPN Fail-Safe
Getting the VPN connected is only half the job. Without the hardening steps below, your real IP can leak the moment the tunnel drops, when your DNS resolver behaves unexpectedly, or through a known vulnerability in how DHCP routes interact with VPN tunnels. This section covers all three.
Kill Switch — UFW Method (Recommended for Most Users)
A kill switch blocks all traffic the moment your VPN interface goes down — so your real IP never leaks. For a conceptual explanation of how kill switches work and why they matter, see our VPN kill switch guide. What follows is the Linux implementation.
First, confirm UFW is installed and check the name of your VPN interface (wg0 for WireGuard, tun0 for OpenVPN):
sudo apt install ufw     # Ubuntu/Debian — skip if already installed
sudo dnf install ufw     # Fedora/RHEL — note: Fedora uses firewalld by default;
                         # UFW is available but non-standard. Consider the nftables
                         # method below if you are on Fedora.

# Check your VPN interface name
ip link show
Apply the kill switch rules (replace wg0 with tun0 if using OpenVPN):
# Reset UFW to default deny
sudo ufw --force reset
sudo ufw default deny outgoing
sudo ufw default deny incoming

# Allow traffic only through the VPN interface
sudo ufw allow out on wg0
sudo ufw allow in on wg0

# Allow LAN traffic (replace 192.168.1.0/24 with your local subnet)
sudo ufw allow out to 192.168.1.0/24
sudo ufw allow in from 192.168.1.0/24

# Allow loopback
sudo ufw allow out on lo
sudo ufw allow in on lo

# Allow the WireGuard handshake to reach the server before the tunnel is up
# Replace 51820 with your provider's WireGuard port, and SERVER_IP with the endpoint IP
sudo ufw allow out to SERVER_IP port 51820 proto udp

# Enable UFW
sudo ufw enable

# Verify rules
sudo ufw status verbose
Test by disconnecting your VPN — all internet traffic should stop immediately. Reconnect the VPN and traffic should resume.
Kill Switch — nftables Method (Advanced)
nftables is the successor to iptables and the preferred firewall tool on Fedora 32+. On Debian 10+ (Buster), nf_tables is the default kernel backend — meaning the iptables command routes through it via iptables-nft — but the nft userspace tool itself is not installed by default and must be installed explicitly. On Ubuntu 22.04+, the transition is similar. If nft is not yet on your system, install it first:
sudo apt install nftables    # Ubuntu/Debian
sudo dnf install nftables    # Fedora/RHEL
nftables offers more precise, kernel-enforced rules and is the preferred approach for server environments.
sudo tee /etc/nftables-vpn-killswitch.conf <<'EOF'
#!/usr/sbin/nft -f

flush ruleset

table inet killswitch {
    chain output {
        type filter hook output priority 0; policy drop;

        # Allow loopback
        oif lo accept

        # Allow traffic through the VPN tunnel interface
        oif "wg0" accept

        # Allow the WireGuard handshake to reach the endpoint
        # Replace SERVER_IP and 51820 with your provider's values
        ip daddr SERVER_IP udp dport 51820 accept

        # Allow LAN traffic — replace with your subnet
        ip daddr 192.168.1.0/24 accept
    }

    chain input {
        type filter hook input priority 0; policy drop;

        # Allow loopback
        iif lo accept

        # Allow established and related connections
        ct state established,related accept

        # Allow traffic from VPN tunnel
        iif "wg0" accept
    }
}
EOF

# Apply immediately
sudo nft -f /etc/nftables-vpn-killswitch.conf

# Persist across reboots
sudo systemctl enable nftables
To make the ruleset persistent, include your kill switch file from the main nftables config rather than editing the system unit file directly:
# Append an include directive to /etc/nftables.conf
echo 'include "/etc/nftables-vpn-killswitch.conf"' | sudo tee -a /etc/nftables.conf

# Enable nftables to run at boot
sudo systemctl enable nftables

# Apply immediately
sudo nft -f /etc/nftables.conf
DNS Leak Prevention
A DNS leak means your DNS queries are reaching your ISP’s resolvers even while your VPN is active, exposing every domain you visit. For a full explanation of what causes DNS leaks and how to test for one, see our DNS leak guide. Here is the Linux-specific fix.
Most modern Linux distributions use systemd-resolved for DNS resolution. Forcing it to send all queries through the VPN’s DNS server requires one additional step that WireGuard’s wg-quick does not always complete automatically.
For WireGuard (wg-quick):
Ensure your wg0.conf includes the DNS line in the [Interface] block (it should be there — if it is missing, add it):
[Interface]
DNS = 10.64.0.1   # Replace with your provider's DNS server IP
Then confirm systemd-resolved is being used and that the VPN interface is getting its DNS:
# Check which DNS server is active on each interface
resolvectl status

# After connecting, wg0 should show your provider's DNS — not your router's IP
If the VPN interface is still using your router’s DNS after connecting, the fix depends on your distro. On Ubuntu/Debian, install openresolv — wg-quick uses it to manage DNS entries:
sudo apt install openresolv # Ubuntu/Debian onlyOn Fedora, openresolv is not available in standard repositories. Instead, ensure systemd-resolved is active and that wg-quick is using the resolvconf method. Check with resolvectl status after connecting — the wg0 interface should list your provider’s DNS. If it does not, set the DNS method explicitly in your config:
# Add to the [Interface] block in wg0.conf on Fedora if DNS is not being applied
PostUp = resolvectl dns %i YOUR_PROVIDER_DNS_IP; resolvectl domain %i ~.
PreDown = resolvectl revert %i
For OpenVPN:
Install the update-systemd-resolved script, which correctly integrates OpenVPN’s pushed DNS entries with systemd-resolved:
sudo apt install openvpn-systemd-resolved # Ubuntu/DebianThen add these lines to your .ovpn config file (or to /etc/openvpn/client/myvpn.conf):
script-security 2
up /etc/openvpn/update-systemd-resolved
down /etc/openvpn/update-systemd-resolved
down-pre
Reconnect and verify with resolvectl status — the DNS entry for the tun0 interface should now show your provider’s resolver, not your router’s.
IPv6 Leak Mitigation
If your system and the websites you visit both support IPv6, traffic can bypass your VPN tunnel entirely over IPv6 even when IPv4 is fully tunnelled — leaking your real IPv6 address to every site you visit. The reliable fix is to disable IPv6 at the system level while the VPN is active.
To disable IPv6 immediately:
sudo sysctl -w net.ipv6.conf.all.disable_ipv6=1
sudo sysctl -w net.ipv6.conf.default.disable_ipv6=1
sudo sysctl -w net.ipv6.conf.lo.disable_ipv6=1
To make this persistent across reboots:
sudo tee /etc/sysctl.d/99-disable-ipv6.conf <<'EOF'
net.ipv6.conf.all.disable_ipv6 = 1
net.ipv6.conf.default.disable_ipv6 = 1
net.ipv6.conf.lo.disable_ipv6 = 1
EOF

sudo sysctl --system
Verify IPv6 is disabled:
cat /proc/sys/net/ipv6/conf/all/disable_ipv6
# Should return: 1
Note: Some services and applications require IPv6. If disabling it globally causes problems, re-enable it and instead block IPv6 traffic to the wg0/tun0 interface specifically using your nftables or UFW rules.
Protecting Against TunnelVision (CVE-2024-3661)
TunnelVision is a DHCP-based attack discovered in 2024 (CVE-2024-3661) that allows an attacker on the same network to inject routing rules via DHCP Option 121, forcing traffic to bypass the VPN tunnel and travel in plaintext. It affects all VPN protocols on all major operating systems — including Linux. (Android is the notable exception: it does not implement DHCP Option 121, so it is not vulnerable.)
The mitigation on Linux is to isolate the VPN in a separate routing table so that DHCP-injected routes cannot override tunnel rules. NetworkManager handles this cleanly via its routing policy settings:
# For a NetworkManager-managed WireGuard or OpenVPN connection,
# force all traffic through the VPN routing table
nmcli connection modify YOUR_VPN_CONNECTION_NAME \
  ipv4.route-metric 50 \
  ipv4.never-default no \
  connection.llmnr no
For manual WireGuard setups using wg-quick, the default AllowedIPs = 0.0.0.0/0 combined with wg-quick‘s use of ip rule policy routing already provides effective protection against TunnelVision. Verify your routing rules are active after connecting:
# Check that wg-quick added a policy routing rule
ip rule show

# You should see a rule pointing to WireGuard's routing table (table 51820 by default)
# Example: 32764: from all lookup 51820
If the rule is absent, your wg-quick version may be outdated — update your wireguard-tools package.
Verify Your VPN Is Working
Once connected, confirm the VPN is actually routing your traffic — not just showing as “connected” in a status command.
1. Confirm Your IP Address Changed
# Run this BEFORE connecting to record your real IP
curl https://ifconfig.me

# Run this AFTER connecting — it should return your VPN server's IP, not your real one
curl https://ifconfig.me
If the IP is the same before and after connecting, your tunnel is not routing traffic correctly. Double-check your AllowedIPs setting — it must be 0.0.0.0/0 for full-tunnel mode.
2. Run a DNS Leak Test
Your IP changing is necessary but not sufficient. You also need to confirm your DNS queries are going through the VPN’s resolver, not your ISP’s. Run a DNS leak test with the VPN active — the resolver shown should be your provider’s, not your ISP’s or router’s.
3. Check for WebRTC Leaks
WebRTC, used by browsers for video/audio calls, can reveal your real IP address even when a VPN is active. Use a browser-based WebRTC leak test tool with the VPN active. If your real IP appears, disable WebRTC in your browser settings (Firefox: set media.peerconnection.enabled to false in about:config).
Troubleshooting
| Problem | Likely cause | Fix |
|---|---|---|
| WireGuard connects but no internet access | AllowedIPs not set to 0.0.0.0/0, or IP forwarding not enabled on server |
Check AllowedIPs in wg0.conf. If you manage the server, verify net.ipv4.ip_forward = 1 in /etc/sysctl.conf |
| WireGuard: no handshake — stays at 0 seconds | Firewall blocking UDP port 51820 outbound, or incorrect server endpoint / public key | Verify the endpoint IP and port in wg0.conf. Check that UFW/nftables allows outbound UDP to the server’s port |
| Connection drops when switching Wi-Fi or going idle | NAT mapping expires — router forgets the tunnel | Add PersistentKeepalive = 25 to the [Peer] block in wg0.conf |
| Slow speeds / large file transfers stall | MTU mismatch — packets are being fragmented | Add MTU = 1420 to the [Interface] block in wg0.conf. If still slow, try 1380 or 1280 |
| OpenVPN: “TLS handshake failed” | System clock out of sync, or certificate/key mismatch | Sync your system clock: sudo timedatectl set-ntp true. Verify you are using the correct certificate files for this server |
| OpenVPN: “No valid secrets” / authentication fails | Missing webkit2gtk or libsecret dependency for the credential store |
sudo apt install webkit2gtk-4.0 libsecret-tools (Ubuntu/Debian) or pass credentials inline with --auth-user-pass credentials.txt |
| NetworkManager VPN connects but traffic not tunnelled | “Use only for resources on its network” enabled — traffic not defaulting through VPN | In the VPN connection settings, go to IPv4 → Routes → uncheck “Use this connection only for resources on its network” |
| VPN stops working after kernel update | On older systems using a DKMS WireGuard module, the module may not rebuild automatically for the new kernel | First check your kernel version with uname -r. On kernel 5.6+ WireGuard is built in — reinstall wireguard-tools only: sudo apt install --reinstall wireguard-tools (Ubuntu/Debian) or sudo dnf reinstall wireguard-tools (Fedora). On older kernels (<5.6) with DKMS: sudo apt install --reinstall wireguard-dkms. Reboot after either step |
Frequently Asked Questions
Does Linux have a built-in VPN client?
Linux has built-in kernel support for WireGuard (since kernel 5.6) and IPsec, but it does not ship with a ready-to-use VPN client in the same way Windows or macOS does. You need either an official provider app (Method 1), manual configuration tools like wireguard-tools or openvpn (Methods 2 and 3), or NetworkManager with the appropriate plugin (Method 4). The good news is that WireGuard’s kernel integration means the heavy lifting is already done — you just need the userspace tools to configure it.
Is WireGuard or OpenVPN better for Linux?
WireGuard is the better choice for most Linux users — it is faster, has lower overhead, and benefits directly from being built into the kernel. OpenVPN is the right choice when you need to bypass a restrictive firewall using TCP port 443, or when your provider does not offer WireGuard. For the full technical comparison, see our WireGuard vs. OpenVPN guide.
Can I use a VPN on Linux without a GUI?
Yes — Methods 2 and 3 in this guide are entirely command-line based and work on headless servers with no desktop environment. WireGuard’s wg-quick tool and the OpenVPN 3 CLI both run fine without a GUI. Method 1 (official apps) also provides CLI tools — Mullvad, NordVPN, and ProtonVPN (via the protonvpn CLI) all include a full-featured terminal client.
How do I make my VPN start automatically on Linux?
All four methods support auto-start via systemd. For WireGuard: sudo systemctl enable wg-quick@wg0. For OpenVPN 2.x: sudo systemctl enable openvpn-client@myvpn. For official apps like Mullvad and NordVPN, auto-connect is a setting within the app itself. NetworkManager connections can be set to connect automatically in the connection profile settings.
Why is my VPN not working after a Linux kernel update?
On Ubuntu 22.04+, Debian 12+, and Fedora 41+ running kernel 5.6 or newer, WireGuard is built directly into the kernel — so a kernel update should not break it. If your VPN stops working after an update, reinstall the userspace tools: sudo apt install --reinstall wireguard-tools on Ubuntu/Debian, or sudo dnf reinstall wireguard-tools on Fedora, then reboot. On older systems (kernel <5.6) that use a DKMS module, you may also need sudo apt install --reinstall wireguard-dkms. If you use an official provider app, updating the app to its latest version is usually sufficient.
How do I fix a DNS leak on Linux with a VPN?
DNS leaks on Linux almost always come down to systemd-resolved not correctly switching to the VPN’s DNS server when the tunnel comes up. For WireGuard, ensure your wg0.conf has a DNS line in the [Interface] block, and install openresolv if it is missing. For OpenVPN, install openvpn-systemd-resolved and add the up/down hooks to your config as described in the DNS section above. After reconnecting, run resolvectl status to confirm the VPN interface is using your provider’s resolver. For a full explanation of what DNS leaks are and how to test for one, see our DNS leak guide.